MDM & GP Tips Blog

Nov 2021
05

How to Use Security Baseline Releases for Windows 11-2

Microsoft has a new operating system, which means we need a new security baseline.  Microsoft released the new package on October 5 which features two new settings and some recommended setting changes.  The Security Baselines for Group Policy are designed around the same principle as the MEM Security Baselines.  They provide an easy and effective way for admins to ensure that they are consistently enforcing a minimum-security level that addresses fundamental security and compliance issues.  The baseline settings are preconfigured by Microsoft security specialists and have been tested for proven compatibility. 

Installing the Windows 11 Security Baselines

Once you download the package you will see that it contains multiple folder directories as is shown below.

If you don’t have the Windows 11 ADMX/ADML templates, you can copy them from the Template folder and paste them into your central store.  The templates are shown below.

The real purpose of the package is to import the new security baselines.  You can import these policies either locally or into AD using the enclosed scripts.  I am choosing to import them into my AD environment using the appropriate scripts as shown below.

Domain Security GPO


Let’s look at some of the settings included in the package.  The package includes a GPO called MSFT Windows 11 – Domain Security.  A big change here is the recommended password length.  While a 14-character password has been supported on multiple Windows 10 versions, Security Baselines have continued to enforce an 8-character password length only, which remains a standard in the industry.  The Windows 11 baseline has now increased the minimum password length to 14-characters as shown in the screenshot below.  Advanced password breaking applications powered by readily available increased CPU power has made the 8-character passwords far too vulnerable as they can be potentially cracked in mere hours.

It is highly recommended that you confirm that all your systems and applications are compatible with a password of this length before you enact this policy.  It’s a good idea to first Enable the ‘MinimumPasswordLengthAudit’ Group Policy setting which is located at Computer Configuration > Windows Settings > Security Settings > Account Policies -> Password Policy -> Minimum password length audit.  Enabling this setting will provide insights into the potential impact of increasing your password length.

Restrict Printer Driver Installations


In July of 2021, Microsoft released CVE-2021-34527 which patched a remote code execution vulnerability in the Windows Print Spooler service.  Essentially, it prevents non-admin users from installing a print driver, which caused a great deal of havoc early on as enterprises that freely allowed standard users to install print drivers were inundated with calls to the helpdesk.  I wrote a blog back in August called the Utlimate Guide to PrintNightmare that lists the options you now have as a result of the update.  Note that Microsoft has added this setting to the Windows 11 Security Baseline as is shown in the screenshot below.

Microsoft Legacy Edge is No More

As Microsoft Edge Legacy reached EOL earlier this year, it is not a part of Windows 11.  That means that all its supported settings have been removed from the baseline.  Only Chromium Edge is now supported.

Script Scanning

According to Microsoft, script scanning was a parity gap between Group Policy and MDM.  As the gap has now been closed, Microsoft is enforcing the enablement of script scanning in this baseline.  Enabling script scanning means that scripts are scanned before being executed to determine their threat status. 

One thing lacking in the Group Policy version of Windows 11 Baseline Security is the ability to enable Microsoft Defender for Endpoint's tamper protection feature which is available using Microsoft Endpoint Manager.  Microsoft does encourage you to enable it however using other means.  More information here.


Oct 2021
28

New Microsoft v93 Security Baselines for Group Policy

Last month, Microsoft released a security baseline for Microsoft Edge version 93.  While there isn’t a whole lot new here it’s important to keep your security baselines up to date in order to ensure you are running best practice.  You can download the latest security baseline packages here by selecting the Microsoft Edge v93 Security Baseline.zip file.  The Security Baselines for Group Policy are designed around the same principle as the MEM Security Baselines.  They provide an easy and effective way for admins to ensure that they are consistently enforcing a minimum-security level that addresses fundamental security and compliance issues.  The baseline settings are preconfigured by Microsoft security specialists and have been tested for compatibility. 

Installing the Microsoft Edge v93 Security Baseline


Once downloaded, you will see that the package contains multiple folder directories as is shown below.  Note that unlike other packages, this one doesn’t include a Template folder as this package does not include the ADMX/ADM template files.  You can download the template files directly from the Microsoft website for any of the current Edge versions.  You must have the required template files in your central store for the package to work.

The next step is to import the new security baselines.  You can import these policies either locally or into AD using the enclosed scripts.  I am choosing to import them into my AD environment using the appropriate scripts as shown below.

In my case, I chose the East Sales OU, and I linked the MSFT Edge Version 93 – Computer GPO.  Note that this is a computer side GPO, so it needs to be linked to an OU that contains computer objects.  Now let’s look at the preconfigured settings below.


There is only one newly enforced setting and that is the disabling of 3DES which is outlined in the screenshot above.  In Microsoft Edge version 95, the 3DES encryption cipher is completely removed and will no longer function so this is way to prepare you for the inevitable deprecation of it. The upcoming baseline security release will have the 3DES setting completely removed.

The other thing new is an addition by subtraction setting.  Since Adobe Flash support has now ended and been removed from Microsoft Edge completely, there is no need to enforce the setting that disabled Flash. 

All in all there were 31 new computer settings and 26 new user settings for Microsoft Edge version 93 which you learn more about here.


Sep 2021
28

Microsoft will offer New Extended Stable Release for Microsoft Edge

Believe it or not, the new Chromium-based Microsoft Edge browser has grown by 1,300 percent in the past year.  One of the contributing reasons to its popularity surge is the perpetual release of innovation that Microsoft unveils on a regular basis in the form of feature updates.  At the same time, Microsoft is aware that many enterprises want to have some degree of control over how often these new features are distributed to their users. 

  • Stable Channel
  • Beta Channel
  • Dev Channel
  • Canary Channel

The Canary Channel puts you on the bleeding edge, providing you with the newest innovations as quickly as possible.  At the top of the chain is the Stable Channel which is best suited for production environment and intended for broad deployment throughout your organization.  Microsoft has traditionally released feature updates every 6 weeks for the Stable Channel and Beta Chanel.  Microsoft is making some changes however starting with Microsoft Edge 94., which is currently scheduled to be released for the Beta Channel beginning the first week of September.  Those using the Stable Channel will have to wait until the week of September 23.  You can see the complete Microsoft Edge release schedule here.

Starting with Microsoft Edge 94, Microsoft is switching to a 4-week release cycle.  Part of this is in reaction to Google’s announcement to do the same thing for Chrome version 96 in the fourth quarter of 2021.  Another reason though is to feed the insatiable appetite that users have for new innovative features.  This of course is what agile software development is all about.  Microsoft knows however that not every enterprise is ready to adapt to a shortened release window.  For organizations that want to move more cautiously, Microsoft will bring a new release channel called “Extended Stable” which will provide a longer 8-week release timeline.  Like the current channels, admins can opt-in to this channel using either Group Policy or Microsoft Endpoint Manager.  If you don’t create a policy for the new channel, Microsoft Edge will default to the 4-week release cycle.

Those who go with the 8-week Extended Stable release option will receive cumulative feature updates aligned with even-numbered releases.  Any feature updates of an odd-numbered release will be then delivered as part of the subsequent numbered release.  Microsoft will continue to provide Assisted Support for the three most recent Stable Channel releases that equates to approximately 12 weeks.  Assisted Support will be available for the two most recent Extended Stable channel releases which equates to 16 weeks.  For more information you can refer to the Microsoft Edge Lifecycle Policy.

Keep in mind that security patches and fixes operate independently and will continue to be deployed as needed.  If you don’t use Windows Update for Business to manage updates, you can always download Microsoft Edge updates using Windows Services Update Server (WSUS).

Aug 2021
24

The Ultimate Guide to PrintNightmare (and overcoming it)

Background and Timelines

Printing is something that most admins don’t want to think about. This tweet (which is a single picture) sums up most admins’ perspective about printers:

https://twitter.com/nixcraft/status/1428786599479988227 

That being said, the original gory details of WHAT the vulnerability is, which include a privilege escalation and remote code execution can be found here: https://www.csoonline.com/article/3623760/printnightmare-vulnerability-explained-exploits-patches-and-workarounds.html

You can be forgiven for not wanting to go too too deep here. But the gist is: If the bad guys convinced your users to click on a thing, that would automatically install an “evil driver” which would then give the bad guy full admin access. I’m summarizing a little bit, but that’s the gist.

Essentially: you are / were open to attack and have to fix it. 

Okay. Got it. So what does fixing it look like? 

There’s three dates we have to take into consideration for the discussion:

  • Anything before July 6th.

  • Between July 6th and Aug 10.

  • Anything after Aug 10.

Let’s break down each date and method here.


Before July 6: How would you mitigate Printnightmare WITHOUT any patches

Microsoft’s recommendations which would at least “Shut the door” on possible attacks (BEFORE the July and Aug patches.)

Tip: These are / were PREVIOUS recommendations (applicable if you don’t have patches everywhere:

  1. Completely disable the Print Spooler Service:

    1. DCs because they’re important

    2. Everywhere else because they’re important too.

  2. Use the “Allow Print Spooler to accept client connections” and set to DISABLE. This will keep the the print spooler service running, but prevent REMOTE connections to the Print Spooler Service. And, moreover, it still works LOCALLY from the machine for local print jobs. It just prevents sharing printers for OTHER machines. This setting is actually a good mitigation on workstations, which in most cases do not need to share their printers with anyone else.  Note that after this setting is deployed it requires a reboot of the system or at least a restart of the spooler service.  (Thanks to Haemish Edgerton for the clarity adjustment here.)

  3. You can use GPPrefs SERVICES or Powershell scripts or whatever to also do the same thing. 

Now the print spooler services are stopped dead. Printing has now stopped. 

Now what?


Dateline: July 6th - The Patch Arrives

The July 6th patch seemed like it would get the problem solved. From the July patch notes: https://support.microsoft.com/en-us/topic/kb5005010-restricting-installation-of-new-printer-drivers-after-applying-the-july-6-2021-updates-31b91c02-05bc-4ada-a7ea-183b129578a7 

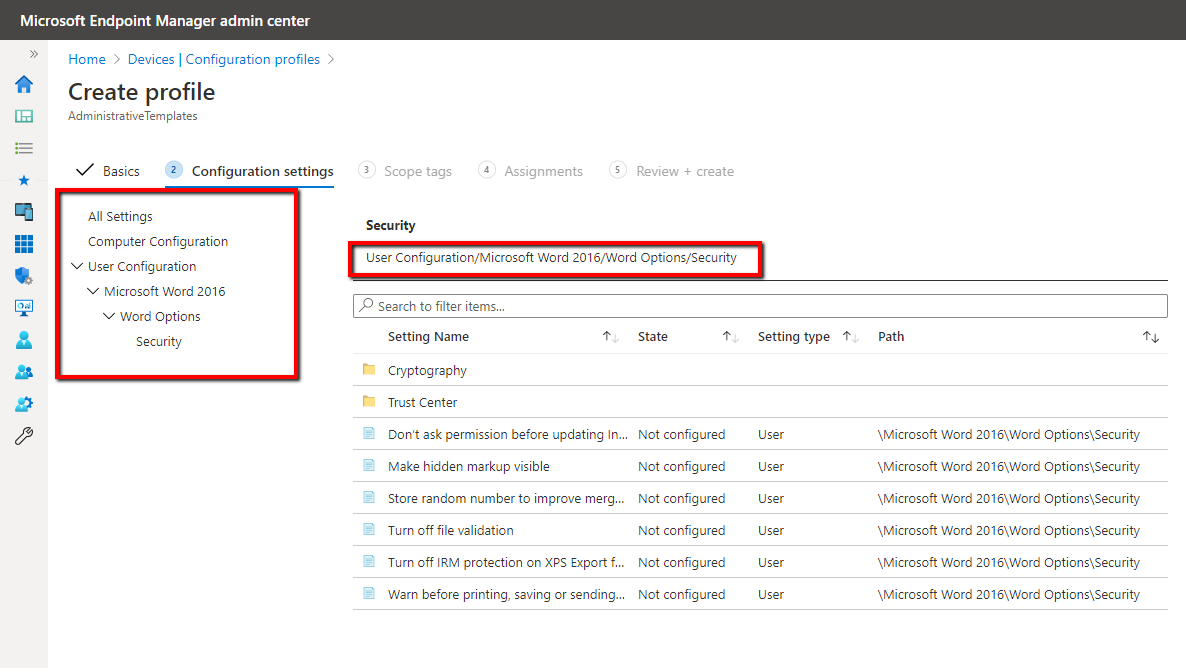
After putting the July 6th patch everywhere, Microsoft ALSO suggested that you use “Point and print Restrictions” policy setting to force “Show warning and elevation prompt” as follows:
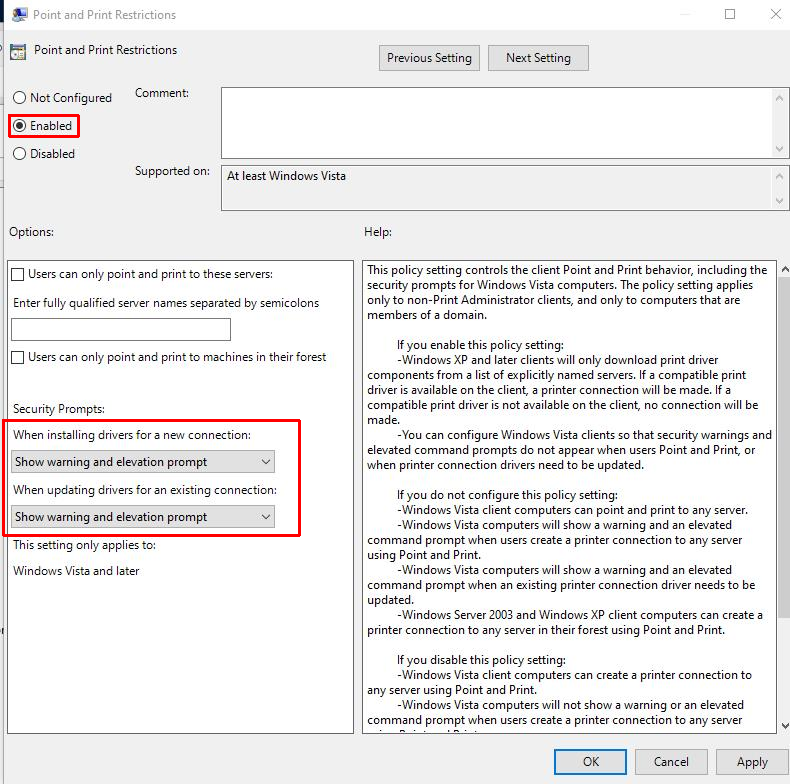
Result:


Setting the value to 0, or leaving the value undefined, allows non-administrators to install signed and unsigned drivers to a print server but does not override the Point and Print Group Policy settings. This is the default value. Consequently, the Point and Print Restrictions Group Policy setting can override this to allow non-administrators to be able to install signed and unsigned print drivers to a print server.


But one day later, this was overcome with some example code. Here’s the original tweet and video: https://twitter.com/gentilkiwi/status/1412771368534528001 

Ack ! Back to Printnightmare and re-shut down all print servers ! OMG.. run for the hills !

Now the print spooler services are stopped dead. Printing has now stopped. 

Now what?


Dateline: Aug 10 - Patch 2 is released (Aka Slam the door shut / no more non-admin access for Print Drivers.)

That’s it, no more Mr. Nice guy. Microsoft decides to go nuclear at this problem. They release another Patch for Aug 10.

From: https://support.microsoft.com/en-us/topic/august-10-2021-kb5005031-os-build-18363-1734-8af726da-a39b-417d-a5fb-670c42d69e78 


Changes the default privilege requirement for installing drivers when using Point and Print. After installing this update, you must have administrative privileges to install drivers.


Net results: 

  1. You need to be a local admin to do anything Printer-y. Technically this was already true; as standard users could never install, say, local print drivers from some unusual source.

  2. Users who are used to finding printers by the Click to Print method are simply blocked at showtime.

Now, there’s a little SIDE NOTE here (Tip of the Hat to Hasain Alshakarti from TRUESEC security @Alshakarti). The door MAY NOT EVEN BE COMPLETELY SHUT. MS released CVE-2021-36958 Aug 11, 2021 that describes the LPE/RCE Windows Print Spooler Remote Code Execution Vulnerability.  Depending on the version of the driver the elevation prompt is not triggering as shown by Benjamin Delphi as seen here https://twitter.com/gentilkiwi/status/1425154484167188480 


Here’s what it looks like (in pictures, not a video) when a user attempts to click to print on a printer (where the drivers have never been installed).

Step 1: Find the printer and get initial prompt

Step 2: Final prompt requiring local admin access to proceed

So, the August 10th patch really did close the door for the good guys.

Now what? How do we let them back in?


Now that the door is shut, how do we open it for SOME people?

So first thing’s first. If the spooler is stopped by ANY of those original methods above, then, nothing else is ever going to work. You’ll have to back out any change which killed the printer spooler.  

Then, after that I’ve rounded up a few POSSIBLE workarounds. Some anecdotally and others from Microsoft’s guidance here (https://support.microsoft.com/en-gb/topic/kb5005652-manage-new-point-and-print-default-driver-installation-behavior-cve-2021-34481-873642bf-2634-49c5-a23b-6d8e9a302872) which we’ll review in a bit.

Additionally, I want to show how there’s also a slew of other workarounds if you happen to be a PolicyPak Customer. I’ll field these at the end.


Tip 1: Just keep using Group Policy Preferences to deliver printers to those who need it. (Maybe. Will likely work.)

So this whole Printnightmare is basically trying to solve the problem of a user making a choice where to print (and that vector being insecure.) 

But there isn’t any problem with real admins making choices to deliver printers via Group Policy Preferences (even after the patches are in place.) That still works. Sure, I realize this is a little “Apples and Oranges.” Because GP Preferences is not “Click to Print”.

But if you could use Group Policy Preferences to mass-deliver printers like this to your domain-joined machines, you could still be a-ok. Here’s an example.

Note there still can be problems. If the server is 2016 (or OLDER, like 2012, 2012R2)... and the drivers are “v3” drivers, then… users are still prompted to re-install them as admins. Gah ! The workaround is to upgrade your server’s print drivers to v4 drivers if they are available (which, there may not be.) 

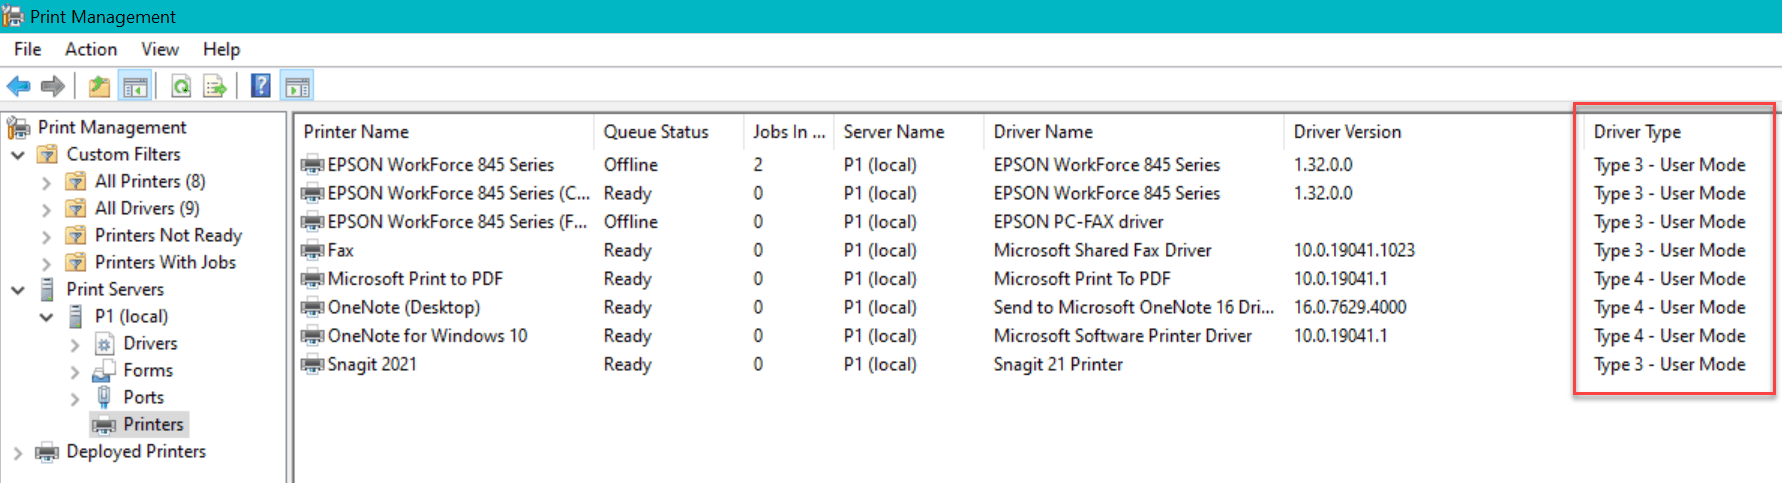
Tip: If you want to see what version of the drivers you're using, on a target machine run the Print Manager utility (again, this is on the endpoint where you already use the printers.) Then, see this column to determine driver type.

The details are documented here by MVP Susan Bradley (@susanbradley): https://www.computerworld.com/article/3630629/windows-print-nightmare-continues-enterprise.html 

I’ll update this space if there’s more on this story.


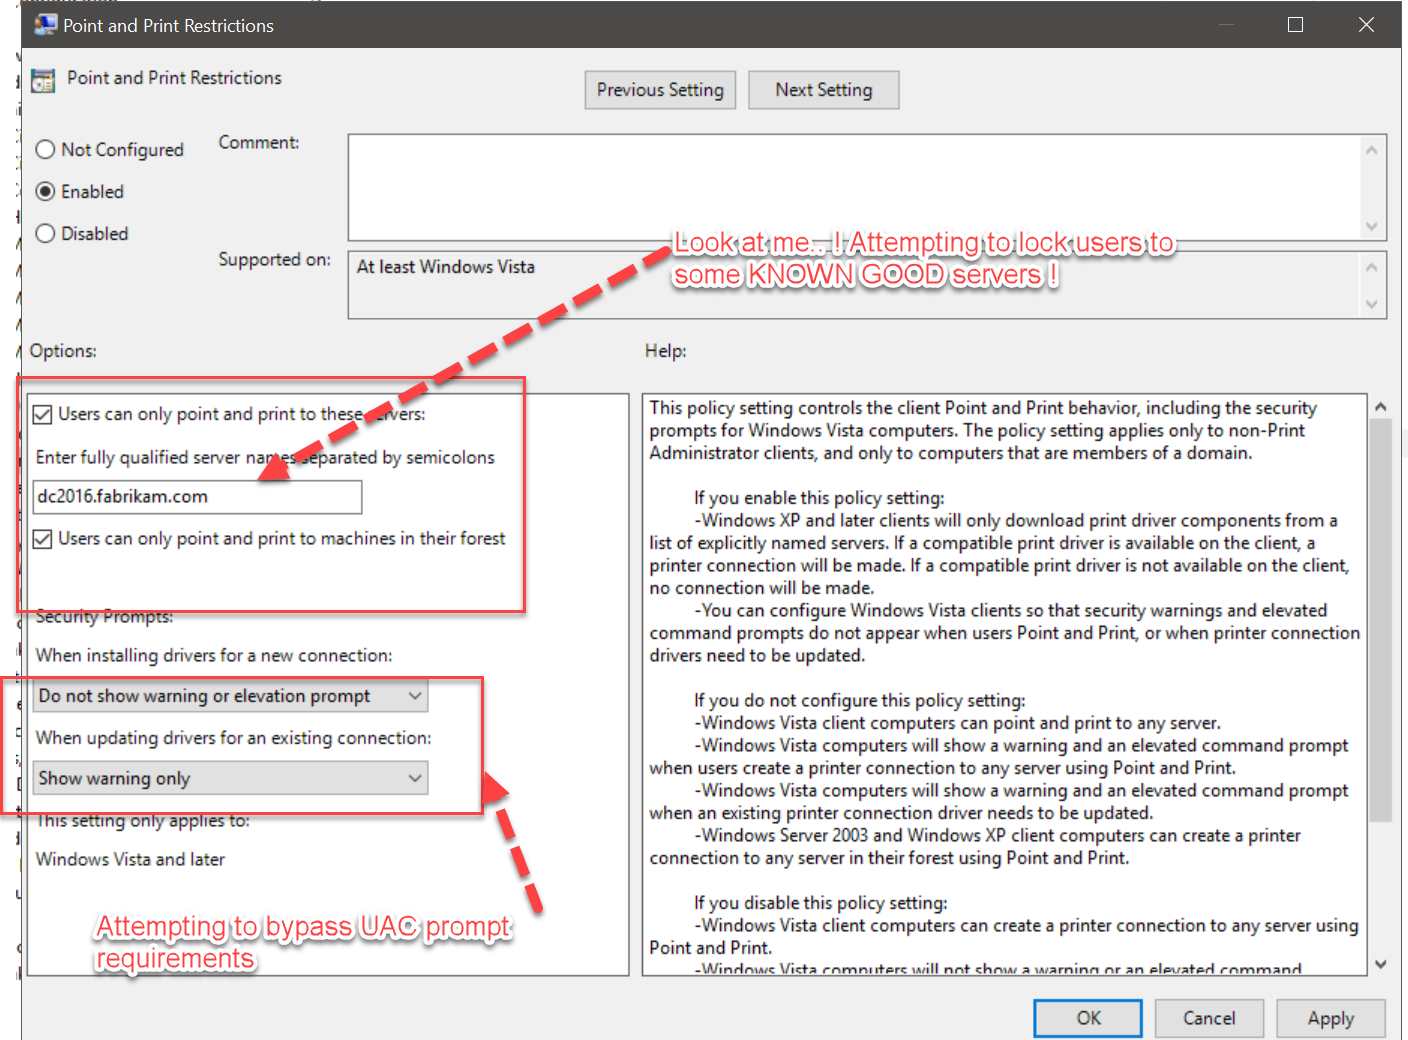
Tip 2 (which didn’t work for me): Use Point and Print Restrictions to specify the GOOD servers

I mention this tip, because it really looks like it SHOULD work, but just.. Doesn’t.  Read thru it anyway, because we’ll make some lemonade out of lemons here in a minute.

Maybe this worked AFTER the July patch but stopped working AFTER the August patch but I didn’t expressly test that.

The idea would be to simply specify the GOOD servers, so the user wouldn’t be able to print to any BAD servers. Example configuration below (again, doesn’t work) which would specify the servers, but then also NOT prompt for elevation.

Microsoft’s text says:


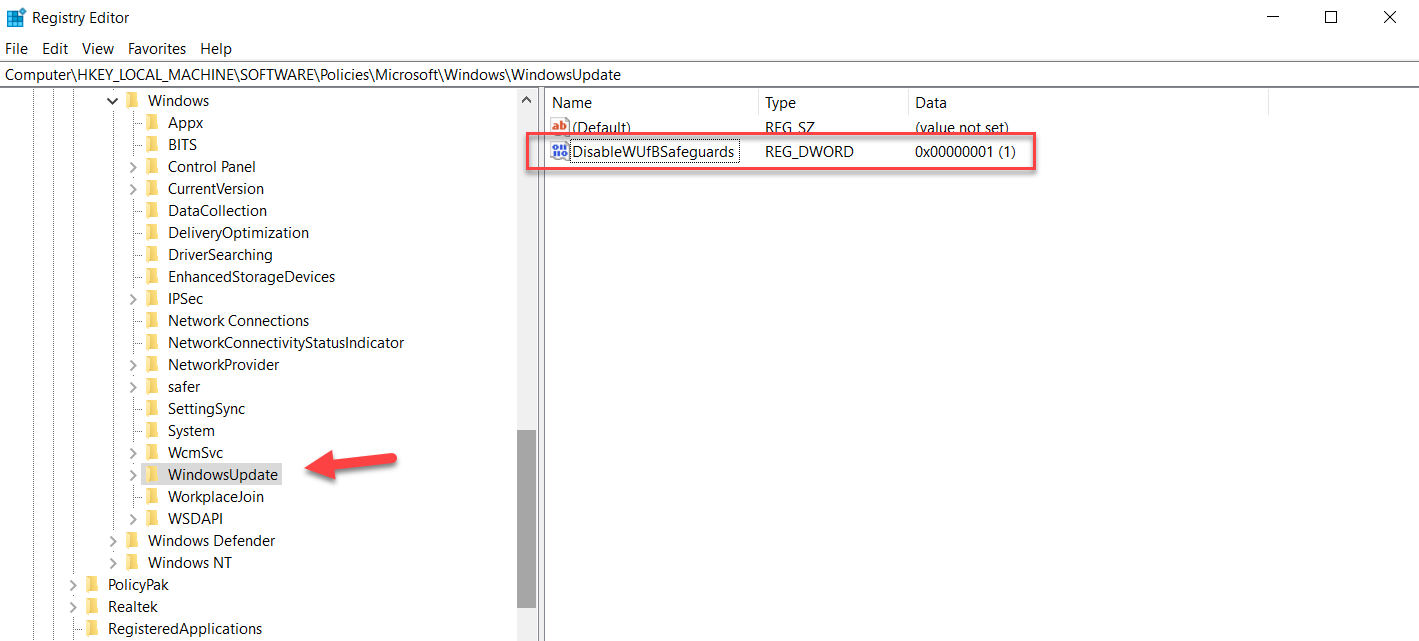
  1. HKEY_LOCAL_MACHINE\SOFTWARE\Policies\Microsoft\Windows NT\Printers\PointAndPrint

  2. NoWarningNoElevationOnInstall = 0 (DWORD) or not defined (default setting)

  3. UpdatePromptSettings = 0 (DWORD) or not defined (default setting)

NoWarningNoElevationOnInstall set to 1 makes your system vulnerable by design.


The result on endpoints would be something like this..

Again: This proposed workaround did not work for me, your experience might be different.

If I was asked how to solve this problem within Microsoft engineering, this is how I would have proposed to do it: Specify ONLY the good servers and make it so Standard Users couldn’t make changes from that list.

Mayyyybe Microsoft will fix the problem (again) this way, but no signs yet.


Tip 2 (From Microsoft):  “Just screw it” and let Standard Users do whatever they want anyway (NOT RECOMMENDED)

So, of course it sounds like, and would be a terrible idea to just turn off the new August 10th protection, even after you’re patched. If you wanted to do that, the advantage of course is that Standard Users could click to print on whatever servers they wanted. Which of course, would also be bad if the bad guys used this against you.

This tested out a-ok as you can see here.

Again, not a great idea, but it does work, even if the August patch is on the machine.


Tip 3: Combine (non-working) Tip 2 and (working) Tip 3 to attempt to make something (reasonably) secure

So Tip 2 where we specified the GOOD server didn’t work. And Tip 3 where we specified that non-admins could overcome this driver thing… that worked.  

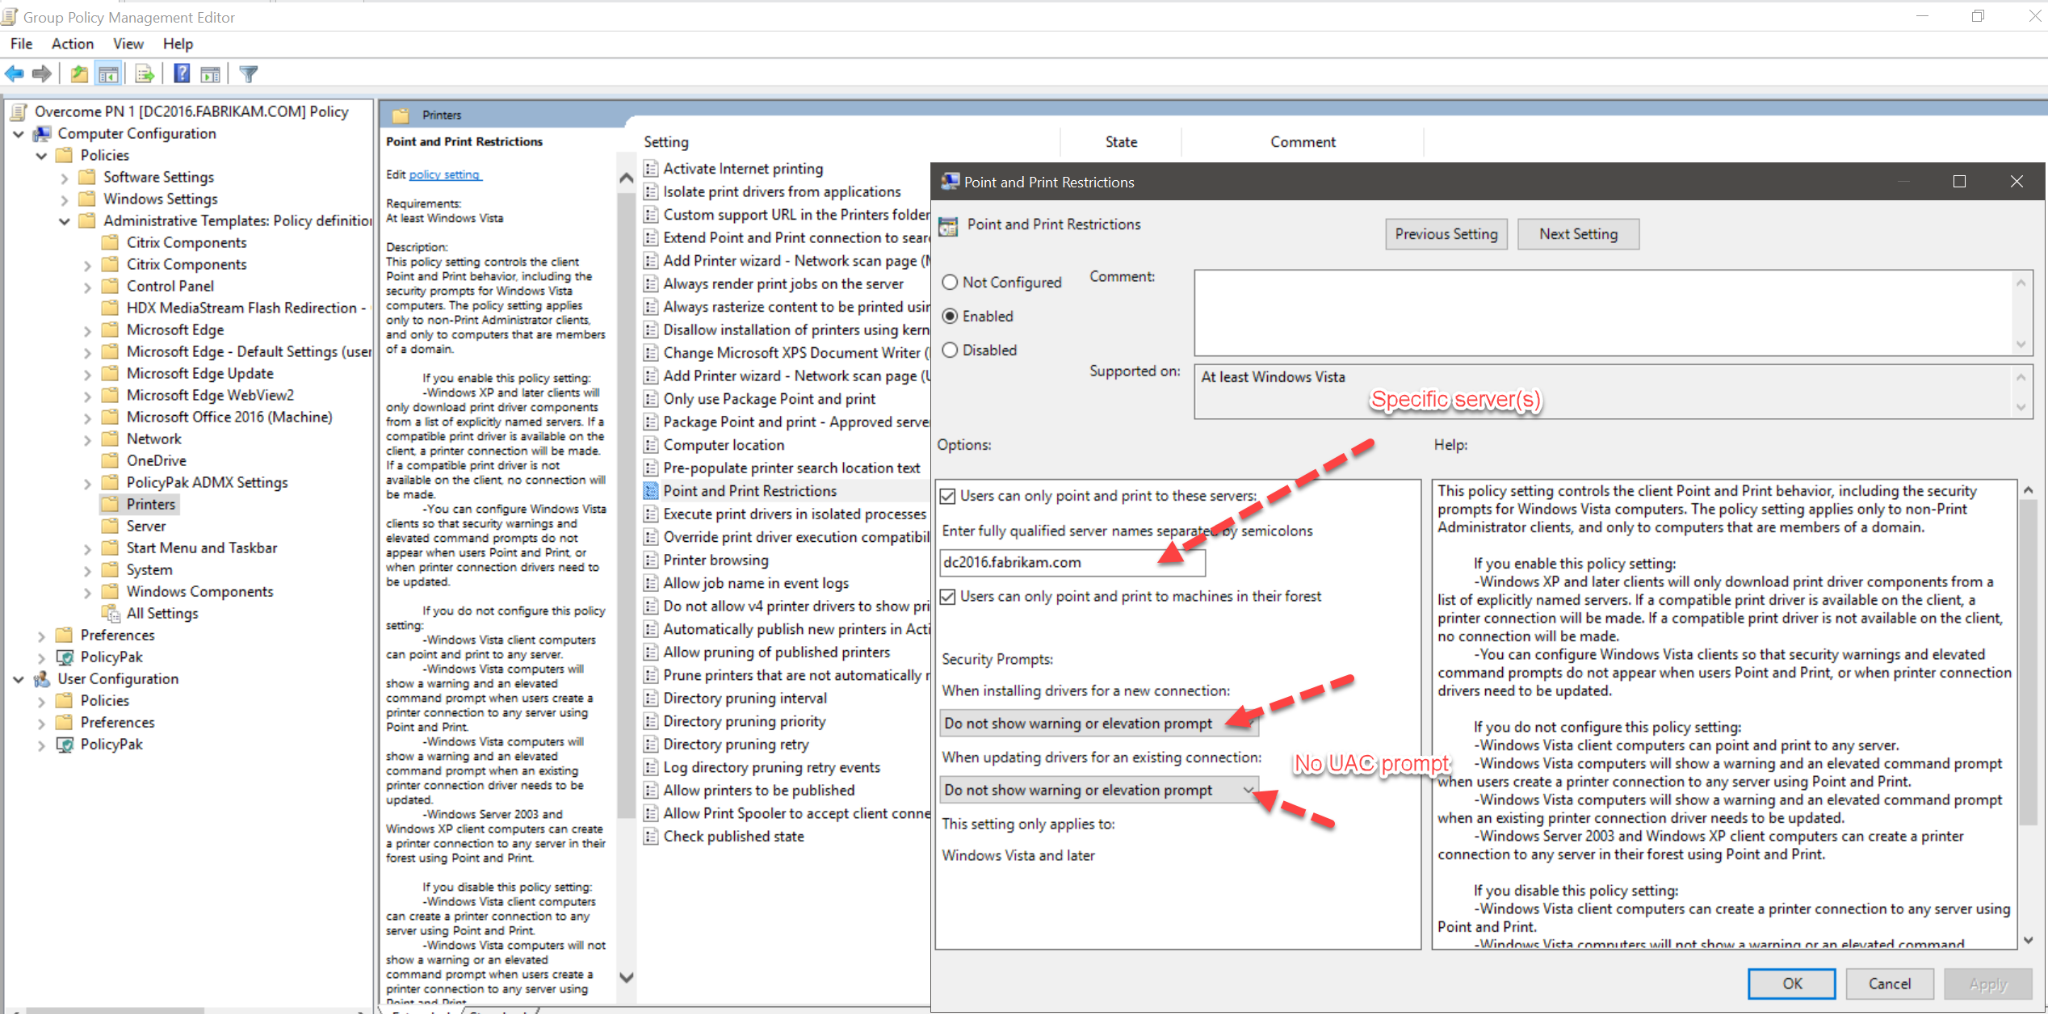
I’m trying here to specify a SPECIFIC server that’s good, and therefore everything else is bad.

I’m then using the special bypass registry key to let non-admins install the drivers.

This should work, right ?

Let’s break it down.

Well, this works when 100% by itself. If I attempt to connect to some rogue server, I do get blocked. Yay.

But then when I add the bypass registry item….  It doesn’t work.. YET !

So far, this is equally bad as just letting non-admins install their own drivers.

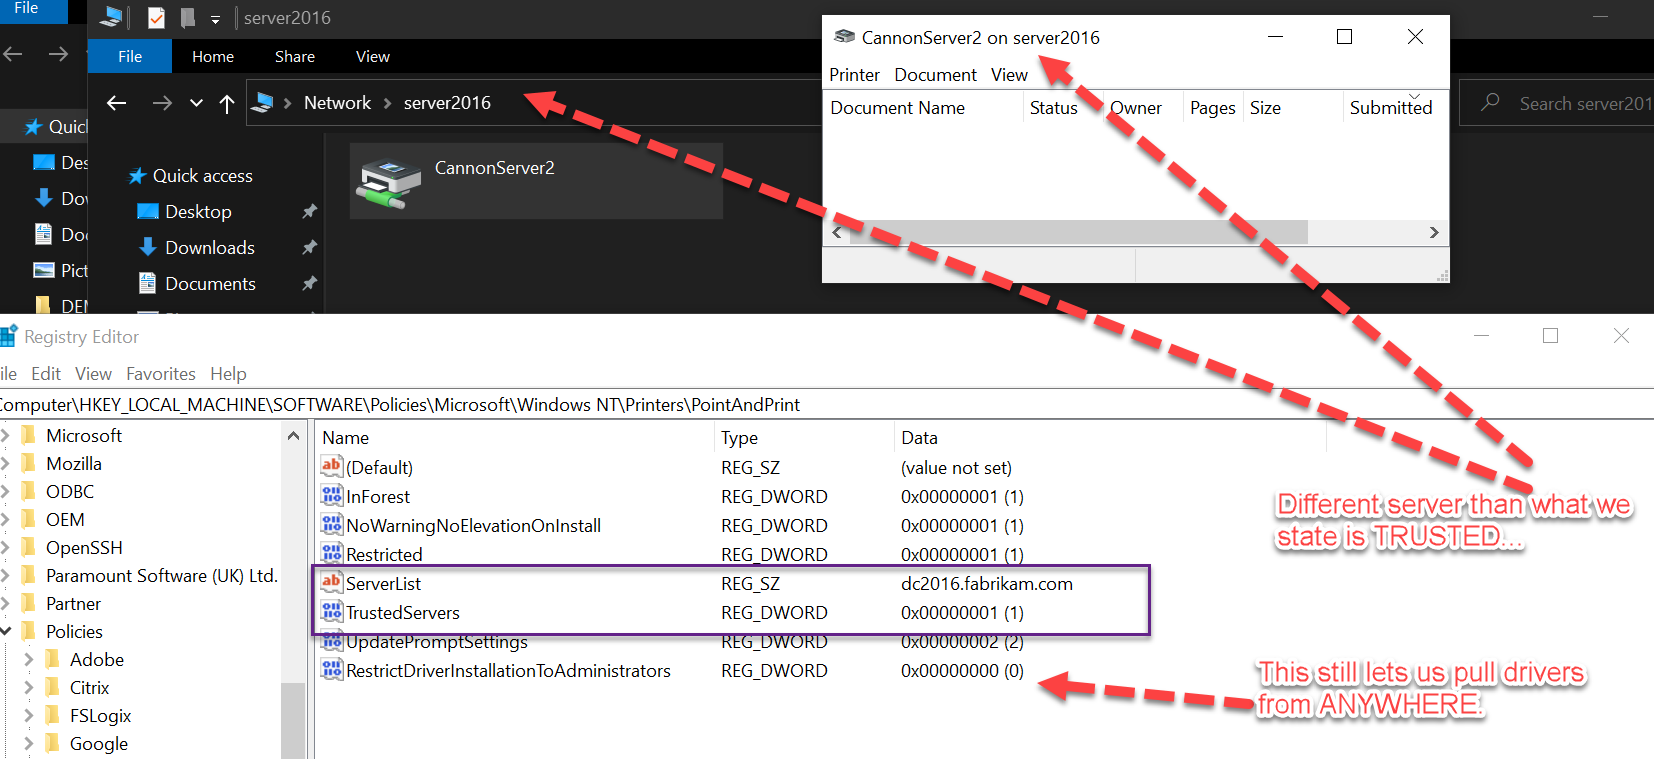
The secret to making this work is a SECOND setting, which expresses where the “Package Point and print - Approved servers” are.

Then, I get the basic / final / good result I want:

  • Non-Admins can point to good “specified” servers 

  • Non-Admins cannot point to rogue servers

Even though I showed how to do this, Microsoft does go out of their way to say : “Important There is no combination of mitigations that is equivalent to setting RestrictDriverInstallationToAdministrators to 1.”

I don’t know exactly what the differences are between the super secure admin only method and the “open the doggie door to the right people” method I just stepped though, and maybe Microsoft doesn’t want us to know. :-) 


Okay: Really, what are some OTHER SECURE workarounds?

First of all the method I showed above is only “OK” because Microsoft stated that you aren’t really in a totally secure state. The second problem with the method I showed is that you have to keep on top of your print servers all the time and update the TWO policy settings to accommodate. Maybe this is fine in a small or static environment. Or maybe this could get out of hand quickly.


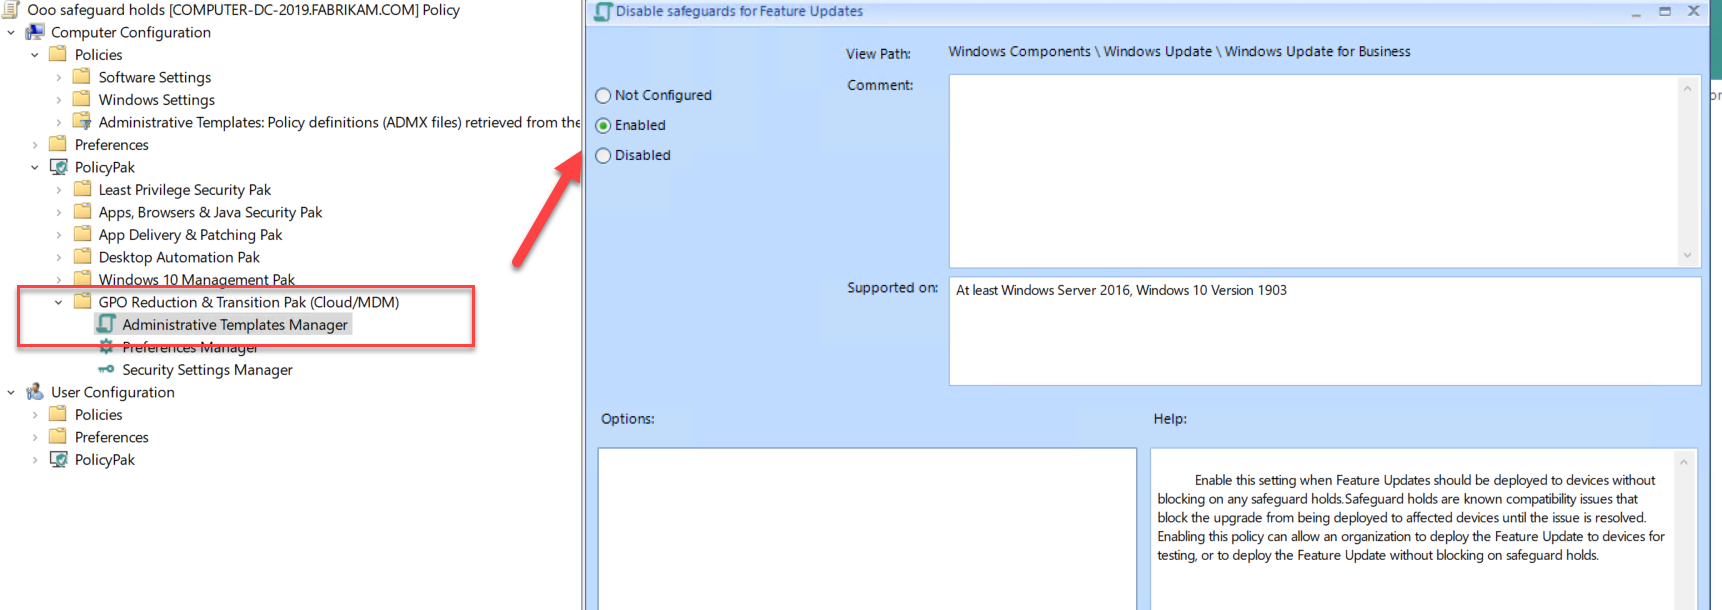
Solid Workaround 1: Using PolicyPak Least Privilege Manager + Printer Helper Tool

I’m going to jump RIGHT TO THE END, and tell you what I think is the ideal solution problem, and, sorry to say, this is not a free solution. And, I’m the founder and CTO of the solution, so, maybe I’m a little biased.

But in short, here’s a video where you can use PolicyPak Least Privilege Manager to elevate the installation of printers on any server, while the person is a standard user. 

Overcome Print Nightmare Standard User UAC Prompts

Why is this the best method? 

  • First, you don’t have to enable this for all users; just the users who need to do this from time to time. 

  • Second, you don’t need to really be opening up admin rights everywhere; it’s just for this key case. 

  • Third, it quacks like the native tool, but does require one click to get it started, instead of “Print to click.” 

  • And lastly, this technique also works for installing LOCAL printers, which might also come in handy.

This also dovetails nicely into the whole “Zero Trust” model. Let only the users who need this technique get this technique. Remove local admin rights and reduce your attack surface.


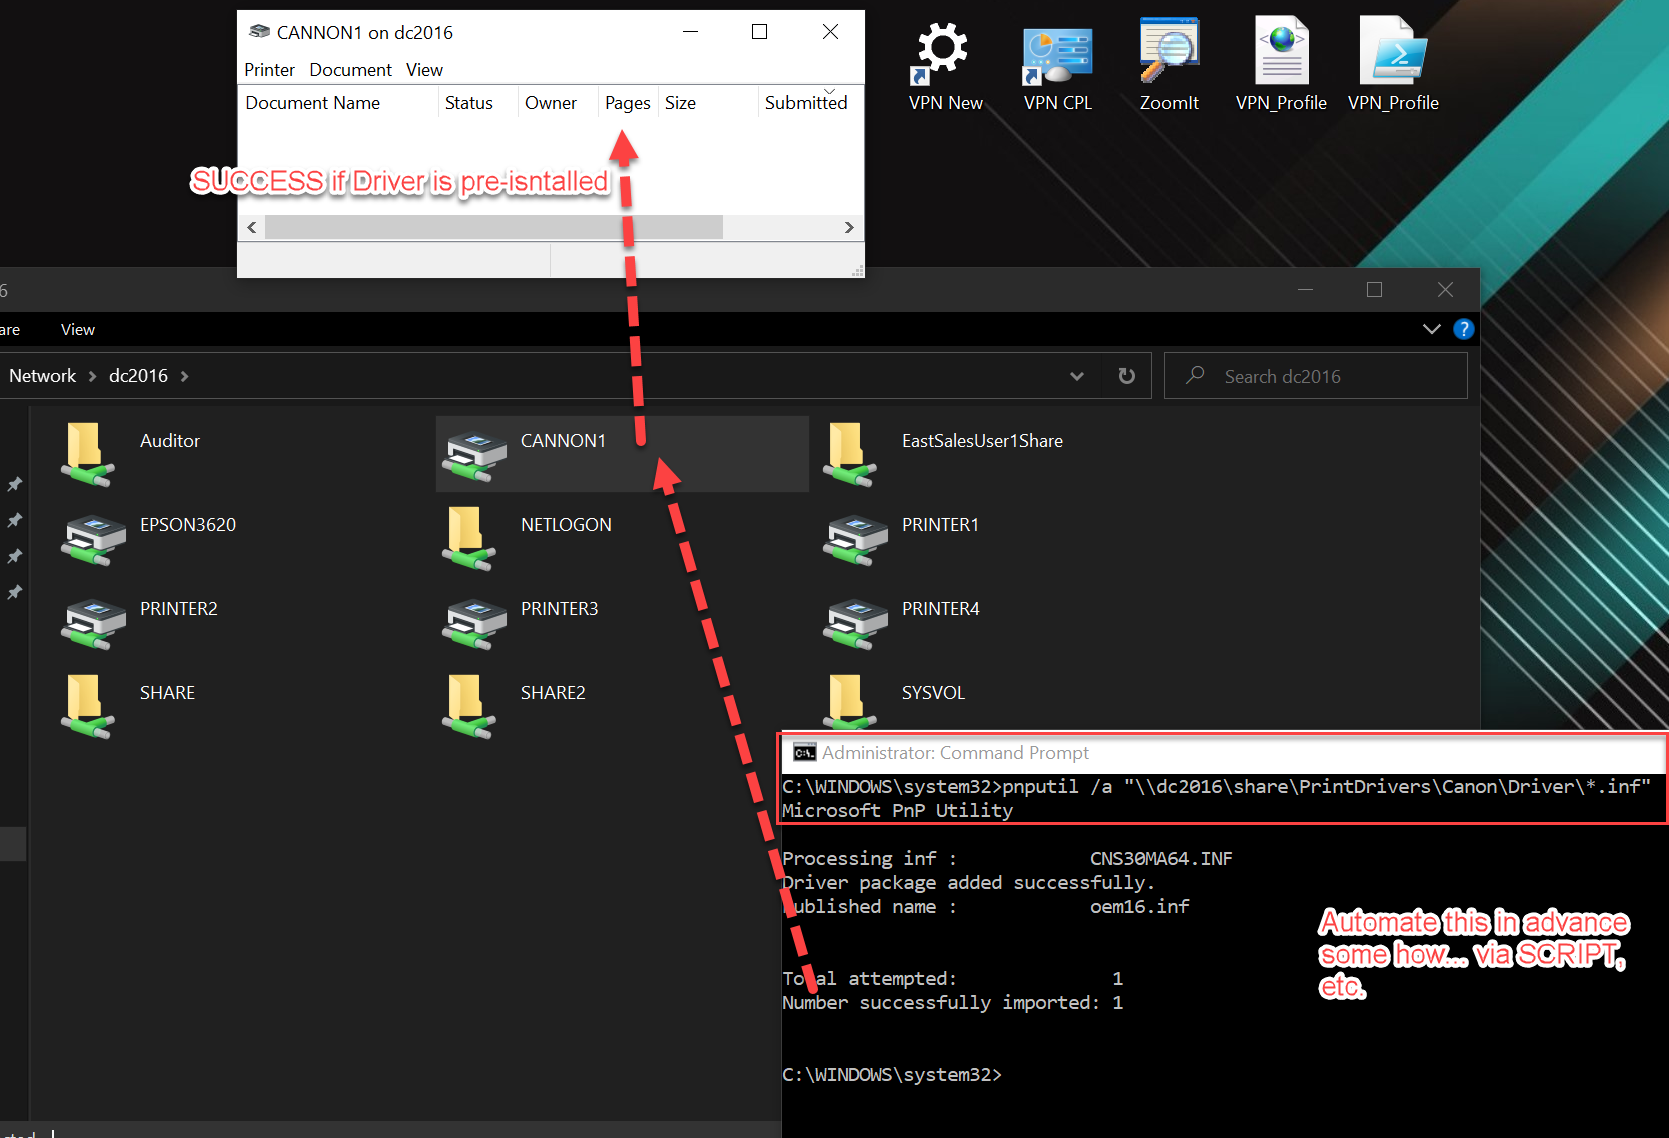
Solid Workaround 2: Pre-install the drivers to the machine (somehow)

If you are able to magically pre-install the drivers into the machine’s local cache then you get a hall pass here.

You can do this in your image, or, if you already have 10,000 machines out there, you can script your way to glory.

Tip of the hat to my friends at PDQ for the inspiration for this tip. You can find their lashup here: https://www.pdq.com/blog/using-powershell-to-install-printers/

The idea I tested manually, worked awesome, as you can see here. The gist is to use PNPUtil to get the drivers pre-installed as an admin. Then the user can click on the network printer and they’re done. No prompts. It just works.


There’s another method that I found, which involves getting a machine prepped with all your drivers and backing up the driver store and preparing them as a “package.”  Printbrm.exe and PrintbrmUI.exe are the in-box utilities which do this. A good write up if you want to do this is here (https://lakeforestconsulting.com/adminprintnightmare/). You can then deploy the package using SCCM, Intune, PolicyPak or another method of your choice. 


Solid Workaround 3: Use the same printer driver as many times as you can

I found this one from here: https://community.spiceworks.com/topic/2328739-best-way-to-deploy-printnightmare-proof-printers-to-non-admin-users?page=1#entry-9250842 (Courtesy https://community.spiceworks.com/people/ethanharris). I’ll just quote him and make this easier for everyone:

“We get around it by using the same universal HP driver on our print server for all black & white printing.  Since they already have the print driver installed they get no admin prompt when they add other printers.

For each color printer we create two printers on the print server, "PrinterName" and "PrinterName-Color" with the actual driver for that printer model used on the -Color version.  It is understood by staff that anyone can add a printer to print in B&W but IT needs to enter the admin password if they need to add a printer to print in color.  This also helps to cut down on printing costs as color printing costs 10x as much as B&W on our printing contract.“


Are there Workarounds if I’m not domain joined?

Yes, Here’s the others I’m able to come up with. If you have more to add, let me know and I’ll add them here and give you credit.


Using an MDM Service + PowerShell

If you use an MDM service like Intune, then you could use the script method from the PDQ guys (see above). That’s a little more than I want to get into here, but it should get you near the goal. 


Using PolicyPak + Least Privilege Manager

I already mentioned the Least Privilege Manager and the Helper Tool; here's a link to an alternate video which shows a few more magic tricks of the Helper Tools.

https://kb.policypak.com/kb/article/889-overcome-network-card-printer-and-remove-programs-uac-prompts/ 


Using PolicyPak + Remote Work Delivery Manager

We’ve had this KB around for a while; but it works great to overcome Printnightmare. The gist is that you copy install files from, say, Dropbox, Amazon S3 or Azure storage, then script the install.

https://kb.policypak.com/kb/article/1103-how-to-deploy-a-tcp-ip-printer-using-policypak-remote-work-delivery-manager/


Using PP Scripts to Deploy Printers for Users (so they don’t have to.) 

This method is similar to the PP + REmote Work Delivery Manager Method, but could be useful if you only have PP Scripts and Triggers and not Remote Work Delivery Manager. 


Using PolicyPak Cloud + GPPRefs TCPIP Printers 

This could help some people, so I’m adding it here.

https://kb.policypak.com/kb/article/788-how-to-deploy-a-tcpip-printer-using-group-policy-preferences-in-policypak-cloud/


Final thoughts about Printnightmare

The world is heading toward Zero Trust. Which means every piece of the network needs (or should have) explicit allow rules.

We believe in this idea at PolicyPak, and can do blocking by default for regular downloads, Windows Store downloads, and even block stuff on USB sticks.

With the Printnightmare patch, they are basically saying the same thing: trust no one but your admins. But if you give someone local admin rights on the box, you’re shooting yourself in the foot.

Remove local admin rights and get to Least Privilege land (using PolicyPak Least Privilege Manager). And then give back what you need to with rules to open up specific admin-like-things to your end-users (like adding printers) as needed.

Hope this guide helps you out.

Special thanks to my two Technical Reviewers: Viktor Hedberg and Hasain Alshakarti for help with the article.

Jul 2021
20

What is Cloud Config?

Not everyone needs to be a power user.  Some employees just need a basic computer to get the job done.  Examples include front line workers, home based users or those who access everything over a web browser.  While these users may only need the very basics, internal IT doesn’t want to skimp on security for them either.  It is for these types of situations that Microsoft began offering Windows 10 in cloud configuration.  Windows 10 Cloud Config simplifies the desktop experience for end users as well as the management experience for admins.   You can use it to configure new devices or reuse existing hardware in order to extend the life of older machines.   Because Windows 10 in cloud config is a Microsoft-recommended device configuration, you also know that it is secure.  Windows 10 Cloud Config is suited for the following types of scenarios:

  • Devices that do not require complex setting configurations
  • Are not dependent on any type of on-premise infrastructure
  • Uses a basic set of apps that are curated by internal IT such as Microsoft Teams and Edge

To be clear, cloud config is not Windows “lite.”  It is the full Windows experience.  You deploy devices with it or assign it to existing devices using Microsoft Endpoint Manager.  From there you manage these machines just like any other MDM enrolled device.  These devices are configured with Windows 10 endpoint security settings and automatically updated through Windows Update for Business.  Admins don’t have to do a thing.  All user data is stored and redirected to OneDrive.  For this reason, Microsoft does not recommend cloud config be used for shared devices.

Cloud config can be deployed to any device running any one of the following operating systems.   

  • Windows 10 Professional
  • Windows 10 Enterprise
  • Windows 10 Education

Cloud config requires the following licenses:

  • Azure Active Directory Premium P1
  • Microsoft Intune
  • Microsoft Teams
  • OneDrive for Business
  • Windows 10 Pro (minimum)

Note that Microsoft recommends Enterprise Mobility + Security E3 and Office 365 E3.

There are two ways to deploy Windows 10 cloud config in Microsoft Endpoint Manager.  The easiest way uses the new guided scenarios feature.  Cloud config is one of the sets of customized steps that admins can use to quickly deploy devices for a given scenario.  You can also configure cloud config manually in order to deploy it using the following steps:

  1. Create an Azure AD group
  2. Configure device enrollment
  3. Deploy a script to configure Known Folder Move and remove built-in apps
  4. Deploy apps
  5. Deploy endpoint security settings
  6. Configure Windows Update settings
  7. Deploy a Windows 10 compliance policy
  8. Additional optional configurations

For this example, we are going to use guided scenario.  You will find it by going to Troubleshooting + support > Guided scenarios.  The first time you access this section you may have to click the “Got it” button as shown below.

Then choose Deploy Windows 10 in cloud configuration by clicking the Start button for that scenario.

The first step involves the naming of the devices during the Windows Autopilot enrollment process.  If you choose not to use the device name template, all devices will use the OEM name.  If you select “Yes” however, you can then create a unique pattern to name the devices.  You can use the %RAND:x% variable to include a string of random characters after Fabrikam.  The X represents the number of random characters allocated.  In the example below we are appending 4 random characters to Fabrikam.

The next step is to select the apps you want to deploy to these devices. Because Cloud Config is about keeping things simple, Microsoft recommends keeping the list of included apps to a minimum so that your cloud config devices are simple to use and manage.  By default, the guided scenario includes Edge and Teams.  As you cannot remove them when using the guided scenario, you must uninstall them at a later time if you don’t want them.  You can then select additional Microsoft 365 optional apps as is shown in the screenshot below.

Next is the Assignment phase in which you will assign the cloud config devices to a group.  Here you can either create a new group or choose an existing group as is shown below.

After you create your group and click “Next” you will be presented with a Summary showing all of your selections.  You can go back to the other tabs, and change any values you added.  Once you verify your settings then click Deploy. 

You can then watch as the resources are being created along with their status.  If there's an error, then the guided scenario isn't deployed, and all changes are reverted.  Once deployed successfully you can use the monitoring and reporting features in the Endpoint Manager.  If you want to remove any of your chosen settings, go to each policy created by the cloud config guided scenario and configure the settings to Not Configured.  Then redeploy the policies. 

In the end, cloud config is just a recommended set of configuration settings for Windows 10 for standardized deployments that are easy to manage.  While it isn’t for everyone, it is an ideal fit for specific user scenarios. 

Jul 2021
10

Managing News and Interests on the Windows Taskbar

Those who have updated to Windows 10 Build 19042.964 via Windows 10 KB 10 KB5001391 have noticed the addition of the News and Interest Feed on the Windows taskbar.  The feed is announced on the taskbar by a weather icon by default that represents nearby current sky conditions.  With a click of the mouse you can gain access to nearby weather and traffic conditions, updates on your personal stocks as well as stories on professional or personal interests.   You can customize the stories and publisher sources by clicking on “Manage Interests” at the top as shown in the screenshot below.  A web browser will then open allowing you to tune your fee.  You can also select “More options” on headlines and article in order to share or save them.

Users can also customize how the newsfeed appears on the taskbar.  By default, the weather conditions icon and temperature are shown.  By right clicking on the icon, users can modify this in the context menu as shown below.

Windows admins will understandably want to manage the appearance of this new feature.  This can be done through either Windows Group Policy or Microsoft Endpoint Manager.  In order to access the associated Group Policy you need to obtain the Feeds.admx file.  You can access it by navigating to C:\Windows\PolicyDefinitions on a machine that has the update installed.  Copy the Feeds.admx file and paste it into your group policy central store.  You will also need the Feeds.adml file as well.  Those in the U.S. will find this file in the en-US directory.  The two locations are shown below.

You must then create a computer side policy by going to Computer Configuration > Administrative Templates > Windows Components > News and interests > Enable news and interests on the taskbar.  You can then choose to enable or disable the feature.  Enabling the policy will allow News and interests on the taskbar and give users access to the applicable context menu.  This will give users the ability to turn it off if they wish.  The policy is enabled in the screenshot below.

You can also manage News and interests in Microsoft Endpoint Manager as well by creating a Configuration profile.  Select Windows 10 and later as the platform and choose Settings catalog (preview) as the profile type.  After naming the policy, select “Add settings” to access the Settings Picker as shown below.

Then do a search for “news” and select “News and interest” and enable the setting as shown below.

You can also manage News and interests via the registry.  Go to:

HKEY_LOCAL_MACHINE\SOFTWARE\POLICIES\Policies\Microsoft\Windows\Windws Feeds. 

Then assign a value accordingly:

  • 0 – show icon and text
  • 1 – show only icon
  • 2 – disabled

Of course these registry values can be deployed using Group Policy Preferences as well.  The screenshot below shows the designated registry key.


Jun 2021
11

GP and MDM Safeguard Holds

While the phrase, “between a rock and a hard place” stems from ancient Greek Mythology, it could easily apply to the task of applying Windows feature updates.  A new feature update can integrate new innovation and added value to your users.  On the other hand, that same update may also cause an rebellion amongst your helpdesk team as a ticket monsoon is created from that update going bad.  It’s a pendulum that can swing both ways.

What are Safeguard Holds?

That’s one reason why Microsoft developed Safeguard holds.  Safeguard holds prevent devices with a known compatibility issue from receiving a new feature update.  By doing so, it protects users from a potentially poor desktop experience should the updated feature not be a harmonious match for their particular device.  Microsoft uses quality and compatibility diagnostic data to identify issues of possible incompatibility.  When such a device is identified, it is placed on hold, which serves as a safeguard.  Devices that are placed on hold are prevented from installing the designated Windows 10 feature in order to preserve the user experience for the time being.  Microsoft then uses the captured diagnostic data to release a fix that addresses the compatibility issue and at some point, the hold will be released.  At that point, the update can then be delivered.  Microsoft also uses holds when a customer or partner reports a disruptive issue directly related to an update for which an immediate workaround is not available.  Those enterprises that utilize Microsoft Endpoint Manager can use Update Compliance reporting retrieve data related to current safeguard holds. 

Keep in mind that safeguard holds only apply to Windows devices that use Windows Update for Business.  Safeguard holds do not pertain to feature updates that are deployed through other channels such as Windows Server Update Services (WSUS) or installation media.  Most enterprises should be using Windows Update for Business as it offers administrators the ability to define Windows Update service rings in order to manage update delivery schedules for different user classifications. 

Opting out of Safeguard Holds

Safeguard holds are a good thing.  However, there are instances when you might not want them.  For instance, internal IT may want to validate the newest feature on a test device (for those who have it, it is best to validate feature updates using the Windows Insider Program for Business Release Preview Channel).  Allowing the update to go through will allow you to experience the compatibility issue firsthand as well as assess other implications concerning the update.  For those who want to bypass holds for special circumstances, Microsoft released a Disable safeguards for Feature Updates Group Policy late last year.  The policy is applicable to any Windows Update for Business device running Windows 10, version 1809 or later with the October 2020 security update installed.


Deploying the Policy

There are several ways to deliver the Disable Safeguards policy to your devices.  For domain-joined devices, Group Policy is easy.  Create a GPO and go to Computer Configuration > Administrative Templates >Windows Components > Windows Update > Windows Update for Business and enable “Disable safeguards for Feature Updates” as shown in the screenshot below.


Administrators can also use an MDM such as Microsoft Endpoint Manager to manage your devices, you can create a custom profile to deploy the policy.  While the involved settings do not appear in the management interface, you can create a custom device configuration profile using OMA-URI settings.  Using Microsoft Endpoint Manager go to Devices and create a custom profile for the Windows 10 platform.  Provide a name for the OMA-URI setting and optional description if desired.  Then add the following settings as shown in the screenshot below.

  • OMA-URI: ./Vendor/MSFT/Policy/Config/Update/DisableWUfBSafeguards
  • Data type: Select Integer
  • Value: 1


Another way is to modify the registry.  You can do this manually or deploy the modification using Group Policy Preferences.  Start by going to the following key:

Go to HKEY_LOCAL_MACHINE\SOFTWARE\Policies\Microsoft\Windows\WindowsUpdate

Right click on WindowsUpdate and select New > Dword (32-bit) Value

Name it DisableWUfBSafeguards

Set its value to “1” and reboot.

The finished result is shown below.

For those enterprises that utilize both domain-joined and non-domain joined machines, there are third party solutions such as PolicyPak that you can use to deploy the Disable Safeguards policy to any internet connected Windows 10 device.  In this case, the PolicyPak editors are built inside the Group Policy Management Editor so creating the policy is simple and straightforward.  Once created, you can deploy it using standard Group Policy, your chosen MDM solution or PolicyPak Cloud.  The screenshot below shows the creation process that utilizes the ADMX templates. 


To be clear, you shouldn’t disable Safeguard Holds to rush out feature updates to standard users, but this policy does provide administrators with greater the flexibility they need at times. 


Sep 2020
11

Microsoft Endpoint Policy Types Explained (Part 2)

Welcome to Part 2 of this article series in which we take a look at the primary policy types that you can create and utilize in Microsoft Endpoint Microsoft (Intune).  In Part 1 we looked at Configuration Profiles and how they are the rough equivalent of GPOs in a traditional AD on premise domain in which some things were hidden, others revealed.  Here we will examine some of the other major components of MEM, all pertaining to security.

Security Baselines

Also referred to Security Profiles, Security Baselines are sets of Windows settings that are preconfigured by Microsoft Security engineers.  There are currently 3 Security Baselines as is shown below.  They are

  • Windows 10 Security Baseline
  • Microsoft Defender ATP Baseline
  • Microsoft Edge Baseline

The baselines by themselves don’t really do anything until you use one of them to create a security policy.  To create a profile you simply click on the appropriate baseline and then create your desired policy.  Baselines should be looked at as minimum security standards, although for most enterprises, they would work admirably.  You can change any of the settings, but keep in mind that when you unconfigure a setting, you are making it less secure.  In most cases, you should simply accept the settings as is and deploy the policies to their targeted users and devices.  The screenshot below shows the preconfigured BitLocker settings within the Windows 10 Security Baseline.

Compliance Policies

Compliance Policies are used to determine whether a device is compliant with a pre-defined baseline.  Compliance Policies vary on the platform of the device.  Some examples of Windows 10 compliant baselines can include the following:

  • BitLocker enabled
  • Minimum OS version
  • Password qualities
  • Firewall enabled and configured
  • Location of the device

You can then select a noncompliance action such as an email notification sent to the user informing them of their device’s noncompliance state.  You can even lock or retire a device that has been noncompliant for a specified duration.  An example of a Compliance Policy requiring a minimum Windows 10 OS version is shown below:

Conditional Access Policies

Conditional Access Policies work hand-in-hand with Compliance Policies.  They prevent access to noncompliant devices.  For instance, you can prevent devices connecting from anywhere outside of the U.S. for instance.  You can also list other conditional access requirements such as the installation of approved applications or MFA as shown in the screenshot below.  You should always test your Conditional Access Policies first as you could deny everyone access including yourself. 

Enrollment Restrictions

Although not a “policy” per se, Enrollment Restrictions play an important role in MEM security.  By default, authorized users can enroll 2 devices into the MEM portal.  If don’t want the default, you can create enrollment restrictions that will allow users to enroll anywhere from 1 to 15 devices.  You can also assign Device Type Restrictions that will prevent users from enrolling either personal devices, or designated device version platforms as is shown in the screenshot below.


Creating a MEM Strategy

As you can see, there are a lot of moving parts in MEM.  The key is to ensure that all of your policies and restrictive settings work in conjunction of one another in order to safeguard your organization as well as ensure that your users can perform their required digital workloads.  While MEM alone falls short of the granular setting coverability of Group Policy, it can play an important role for new startups and established companies that have significant numbers of mobile and remote devices.


Sep 2020
02

Microsoft Endpoint Policy Types Explained (Part 1)

Microsoft Endpoint Manager (the Intune part), is a powerful device management and endpoint security system that is constantly evolving.  What began as a portal to manage and secure mobile devices can now manage desktop computers, virtual machines and even servers.  It can now deliver a broad spectrum of configuration and security settings as well as intelligent cloud actions.  Because of this, it’s hard to keep abreast of all of the changes and informational resources are perpetually outdated. 

Microsoft Endpoint offers multiple policy types.  With so much confusion out there concerning which policies do what, I thought it might be a good time to take a snapshot of the state of Microsoft Endpoint as it is today.  This two-part series will cover a quick review, (or for some an introduction), on the various parts of this rapidly expanding management ecosphere.

Configuration Profiles


This has long been the bread and butter of Intune.  Configuration policies are the equivalent of Group Policy Objects.  A configuration profile is created to deploy managed settings to targeted devices or users.  Like other MDM solutions, Microsoft Endpoint supports more than just Windows.  When you go about creating a configuration profile, you can choose between multiple platforms including Android, iOS, iPadOS, macOS and Windows as is shown in the screenshot below.

For the sake of this article, we will focus on Windows 10.  You then select which profile type you want to configure settings for.  The list of profiles has greatly expanded over the years.  Some of the profiles available at this time include:

  • Device Restrictions (Think Group Policy restrictions)
  • Edition upgrade and mode switch
  • Endpoint Protection
  • VPN
  • Wi-Fi

Below is an example of the available Control Panel Settings than you can block within the Device Restrictions policy.

A wizard then guides you through the process of configuring your desired settings and deploying them to the applicable targets.  While the number of available settings offered within Microsoft Endpoint has exponentially grown over the years, it still doesn’t come close to the more than 10,000 settings offered by the culmination of Group Policy and Group Policy Preferences combined.  While its capabilities and offerings may fall short for on-prem AD enterprises, it does provide ample coverage for many mobile and non domain-joined devices. 

Administrative Templates

Administrative Templates is one of the available Configuration profiles but I want to focus on it separately.  These are ADMX settings, some of the same ones you are accustomed to configuring in Group Policy Administrative Templates that includes both Computer and User side settings.  Here you can configure settings for things such as Microsoft Edge, One Drive, Word, Excel, etc.  In the screenshot below you will notice the same hierarchical structure you are familiar with in Group Policy Administrative Templates.  Again, while the list of available ADMX settings has grown substantially, it still falls far short of what is currently available in native Group Policy. (Hint: Use PolicyPak MDM to take 100% of real on-prem GPO settings and use them with Intune.)

Custom Profiles

One more Configuration Profile type I want to focus on is Custom Profiles because a lot of people find them confusing.  Windows 10 devices contain Configuration Service Provider (CSP) settings and it is these settings that MDM solutions actually manage.  MDM has the ability to manage any CSP setting, but not all of these settings are currently built into the Microsoft Endpoint interface.  That is where custom profiles come into play.  If you want to deliver settings to an available CSP that isn’t accessible within the Microsoft Endpoint, you can create a custom profile which does require some input the following settings:

  • Name:  The name is for your own reference to help you identify it.  Use any name you wish.
  • Description:  Enter a short summary of what the profile does and any other pertinent details
  • OMA-URI:  The OMA-URI settings are unique for each platform be it Android, iOS, Windows, etc.    It is also case sensitive so be careful to type in the setting path correctly.  To configure settings for a Windows 10 device you would type the path: Vendor/MSFT/Policy/Config/AreaName/PolicyName
  • Data type:  The data type will vary based on the OMA-URI setting.  The options are String, String (XML file), Date and time, Integer, Floating point, Boolean and Base 64 (file)
  • Value: Here is where you associate the OMA-URI value you wish to enforce.


Below is what the Custom Profile creation process looks like in Microsoft Endpoint.

So that sums up our look at Configuration Profiles. 

In case you want a more in-depth view of these, I suggest you check out my MDM book.... www.MDMandGPanswers.com/book where I give more details and examples.

In Part 2 of this series, we will look at the other policy types such as security and conditional access.

Aug 2020
18

A Great Little Windows Privacy Tool Called Spydish

I came upon this cool little app the other day and wanted to share it.  It is a Windows 10 privacy tool called Spydish.  It’s a very small app that you can download from the developer’s GitHub site.  It runs as an EXE file so there’s not installation necessary.  The premise of the app is straightforward as it simply checks if privacy related policies are enabled on your Windows 10 machine.  It also gives you the option to enable any of the included settings or return them to their default state.  The application can only be run locally so you cannot use it to access privacy settings of remote machines.  It doesn’t require Group Policy so you can run it on a Windows 10 Home version.  While you wouldn’t use it to manage the privacy settings of your enterprise fleet of laptops, it’s a quick way to see which privacy settings are set on a designated Windows 10 system and modify them.   

Once opened, Spydish lists a series of privacy related policies in a sidebar on the left.  Settings are grouped in different categories such as Privacy, Cortana, Bloatware, App Permissions, etc.  You can choose the entire allotment of Local Computer Policies, a selected group or groups or pick individual settings.  Then click the Analyze button as is shown in the screenshot below.  A readout appears almost instantly, showing the current settings for each policy. 

As easy as it is to obtain the current state of your privacy settings, it is just as easy to apply or revert them.  In the screenshot below I have selected the Microsoft Edge group of settings.  As you can see, none of the settings are currently configured.  Now simply click the “Apply selected” button as is shown below.

Spydish will then apply all of the settings as shown here.


Clicking “Revert selected will revert any settings back to their default state.  While users can modify Windows 10 privacy settings manually, Spydish is a way to get the job done quick and effortless.  Check it out.