MDM & GP Tips Blog

Feb 2023
06

How to Disable Nearby Sharing with Group Policy and Intune

Nearby Sharing is a feature in Windows 10 and Windows 11 that allows you to transfer documents, pictures, and links to other compatible devices that are near each other using a combination of Bluetooth and wireless communication. It’s a great feature that fosters collaboration between team members. Maybe. So indeed, there are some instances in which you don’t want to allow this feature such as an educational environment where students are taking an online exam for instance. We will look at a couple of ways to disable this feature.

Nearby Sharing is found under Shared experiences in your system settings as shown below.

To manage Nearby Sharing using Group Policy, create a GPO and go to Computer Configuration > Policies > Administrative Templates > System\Group Policy > and disable “Continue experiences on this device” as shown in the screenshot below. When disabled, Windows device will not be discoverable by other devices and cannot participate in cross-device experiences.

If you want to use Intune, create a configuration profile, and select Windows 10 and later as the platform and choose Templates > Administrative templates as the profile. Then follow the same template path - Computer Configuration > Policies > Administrative Templates > System\Group Policy > and disable “Continue experiences on this device” as shown below.

Users will no longer be able to transfer files amongst each other on their enterprise devices.

Feb 2023
02

Go and Get Rid of those Old Group Policies that are no Longer Used

Many people have a hard time parting with stuff. That’s why the self-storage industry is so successful regardless of the what the economy is doing. Just as a lot of the stuff contained in storage units will never be used again, there are probably some unused group policies that are still lingering on your servers taking up space and creating unnecessary clutter. A couple good examples are GPOs that have settings disabled or are no longer linked to anything.

You can disable/enable settings for any GPO in the Details tab in Group Policy Management Console. As shown below, you can disable computer configuration settings, user configuration settings, or all settings configured within the GPO.

Keep in mind that its best practice to only configure settings for one side or the other. A GPO that is configured on both sides should be split into two separate GPOs in the first place. Therefore, there’s no need to have one side disabled as shown below.

Disabling both sides of a GPO means that the GPO is essentially doing nothing. If these settings are no longer required, then they should be decommissioned entirely by deleting the GPO.

If you have a well-designed AD with a well-defined OU structure, you need only link your GPOs to an applicable OU and assign it to the Authenticated Users group. This makes security filtering easy and straight forward. Unlinking a GPO is the same as turning it off for a designated OU. A GPO that isn’t linked anywhere is probably one that is no longer needed such as the GPO shown in the screenshot below. In this case, this GPO could probably be decommissioned entirely.

There are some exceptions, however. For instance, you may use some GPOs for testing purposes that are only used for brief periods. You also may have some GPOs you only want turned on at various times of the year. An example might be a school system that enacts certain policies at the start or close of the school year only.

Remember that you must delete a GPO you must do so from the Group Policy Objects node where you can view all your GPOs in alphabetical order. Right clicking on a GPO link will only delete the link itself, not the GPO. Before you delete any GPO, make sure you have a backup of them just in case you find out down the road that you really do need that policy for something.


Jan 2023
24

How to Verify Your Current Intune Service Release Version

Anyone that works with Microsoft Intune has experienced this. You read about a newly released Intune preview feature that sounds enticing. You then logon to your Intune portal only to find its not there. What’s the deal?

Microsoft regularly releases new updates to the Intune platform at least once a month. Each service release includes new features, capabilities and bug fixes. Like regular Windows updates, these service releases are deployed using a phased approach. Not all tenants receive these service releases simultaneously, however. For instance, government related tenants are updated last. Some geographcial parts of the world receive them before others as well. This methodical approach is done to identify issues before being released to all Intune customers. If your Intune portal lacks a new feature you just read about, chances are it’s because you’re not running the latest Intune service release version yet.

The Tenant Status Page

There’s an easy way to find which service release version your Intune portal is currently running. Navigate to Tenant Administration and select Tenant Status. Here you will see the Service release version as shown in the screenshot below.

Here you will also find other information such as your Tenant name, Tenant Location, the number of licensed users present and the number of Intune enrolled devices. If you find that your Service release version doesn’t match up with the latest one you read about, just be patient and check back in a week.

Jan 2023
12

3 Ways to Enable/Disable LSA on Windows 10 and 11

Microsoft introduced a process called Local Security Authority (LSA) a while back for Windows 8.1. LSA performs security related tasks such as the verification of logon attempts and password changes. It also creates access tokens, enforces local security policies, and protects and adds security protection for stored credentials. With the growing threat landscape out there, it’s a good thing to enable for your Windows desktops and servers.

The good news is that LSA protection is enabled by default for devices running Windows 11, 22H2 that meet the following conditions:

  • Windows 11, 22H2 was newly installed on the device and not upgraded from a previous release
  • The device is enterprise joined be it AD domain joined, Azure AD domain joined or a hybrid configuration.

While Microsoft advocates enabling LSA across your enterprise, they recommend that you first identify all LSA plug-ins and drivers that are in use within your organization and ensure that they are digitally signed with a Microsoft certificate and perform as expected. You can refer to this document for more information.

As of right now, there is no way to enable/disable LSA using Intune. Your three available management options for now are Windows Security, the registry, and Group Policy.

Enabling LSA on a Local Device

If you just have a few computers to manage, you can enable them locally on the desktops themselves by going to Windows Security > Device security > Core isolation details and enable the toggle under the Local Security Authority protection section. In the screenshot below, LSA is currently disabled.

Registry

You can manage LSA through the registry, either using the local registry editor or a GPO using Group Policy Preferences. The required key path is as follows:

SOFTWARE\Microsoft\Windows NT\CurrentVersion\Image File Execution Options\LSASS.exe.

If you want to enable LSA using Auditing mode, click on the LSA key and create a value called AuditLevel. Select REG_DWORD as the value type and type 00000008 in the value data box. This is a good option to identify LSA plug-ins and drivers that will fail to load in LSA Protection mode.

To fully enable LSA, create a value key called RunAsPPL, choose REG_DWORD and type 00000001 as shown in the screenshot below.

You can create a GPO and use Group Policy Preferences to push out these registry values. Go to Computer Configuration > Preferences > Registry > right click and choose “New registry item” and input the required values as shown below.

Group Policy ADMX

You can enable/disable LSA using Group Policy as well. In Group Policy Management Editor go to Computer Configuration > Administrative Templates > System > Local Security Authority. The setting you want is “Configure LSASS to run as a protected process.” In the screenshot below you will notice a down arrow beside the setting title. The down arrow indicates that the setting is a preference setting and not stored in the typical group policy location in the registry.

Conclusion

Hackers are constantly trying to subvert the Windows logon process which is why you need to protect it from hackers as much as possible. LSA is a great out-of-the-box utility to help you achieve that.


Dec 2022
29

New Intune Feature - Multiple Admin Approval Process

A new feature update was released in the 2211 November update for Intune. The feature is called, Multiple Admin Approval Process (MAA). The premise for the new feature is to protect against a possible compromised administrative account using something called Intune access policies. These access policies require that a change be approved by a second administrative account before being applied.  An access policy states what resource will be protected and which group of accounts are permitted to approve the changes to those resources.

Currently, MAA is supported for the following resources

  • Apps deployments
  • Script deployments to devices running Windows of macOS

Anytime any admin goes to create or edit an object that involves a resource that is protected by an access policy, it must be approved by an approver without exception.

Let’s use a scenario to demonstrate how MAA works. First let’s create an access policy. To create an access policy, you must be assigned one of the following roles:

  • Intune Service Administrator
  • Azure Global Administrator

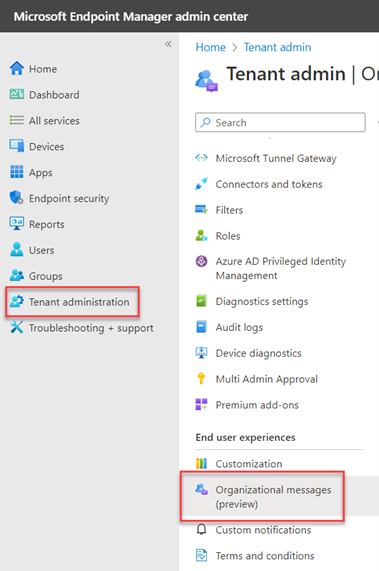
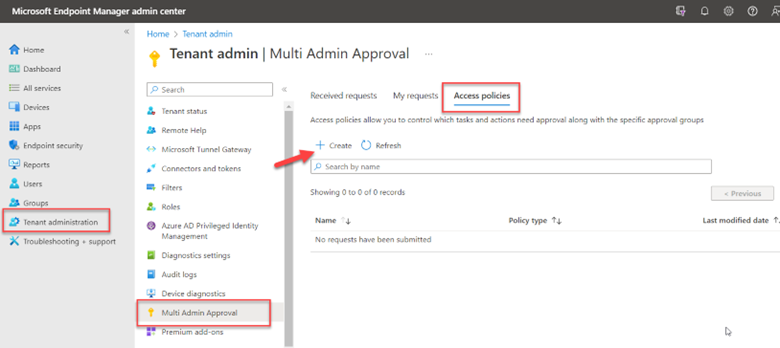
In the Microsoft Endpoint Management admin center, go to Tenant Administration > Multi Admin Approval > Access policies and click “Create” as shown in the screenshot below.

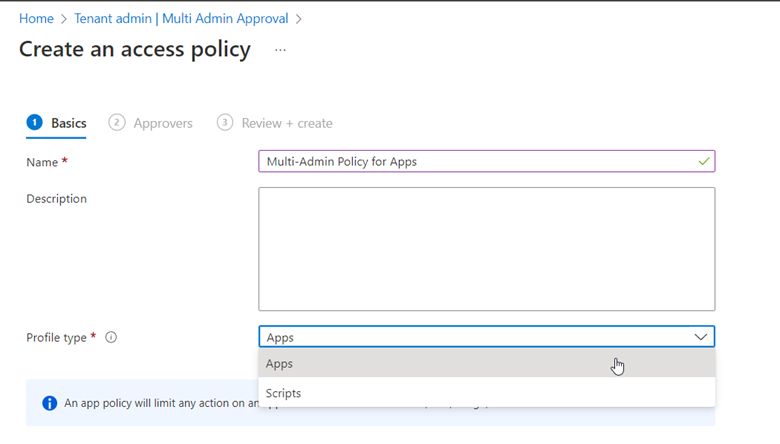
Name the policy and then choose the resource you want to protect.

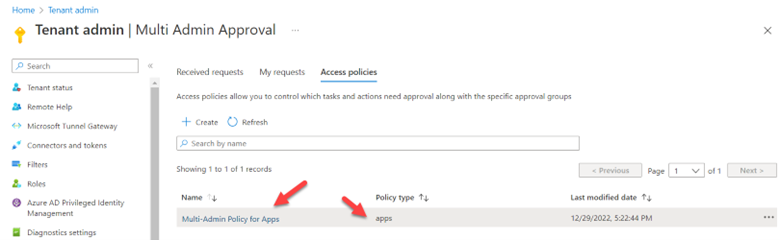
The final step is to choose an Approver group. Any user that is a member of this group can approve requests.  Now I have created my first MAA access policy as shown below.

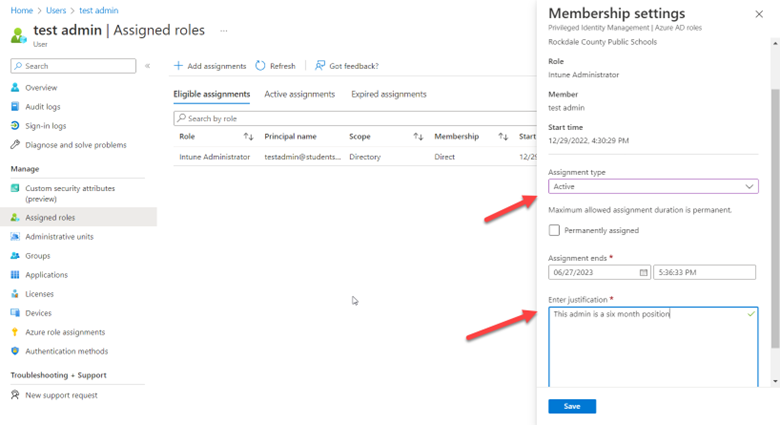
For this demonstration, I created a temporary Intune administrator account.  When creating temporary accounts for testing purposes, it is good to define an active time window for these accounts so that they are deactivated automatically if forgotten. As shown in the example below, I created an account called testadmin and I defined a start and ending time for its active state.

Now, I will log on to Intune using the account I just created. I go to Apps > All apps and click Add. I then create a policy to deploy Windows 365 apps to Windows machines. In the final Review + Create screen of the wizard, there is a Business Justification section at the bottom, prompting the requester to state the justification for doing this. Also note the outlined banner alerting requester that they must enter a business justification and that the request must be approved before being implemented. Once the business justification has been entered, click “Submit for approval” and the request is now sent to Received requests where it can be reviewed.

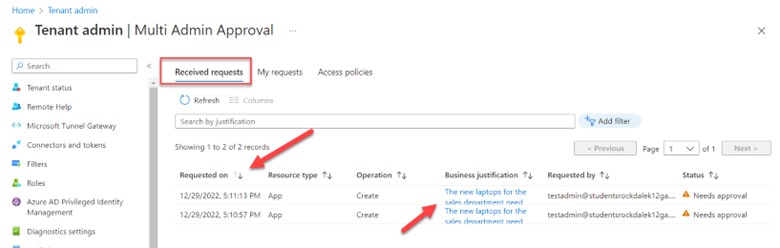
In a separate session, I have logged into Intune using an account that is a member of the approver group. As shown in the screenshot below, the request now appears (in this example, I created two requests). To approve or deny the request, click the URL in the Business justification column.

After clicking on the URL, the approver is shown the requested resource changes. The request can be approved or denied and the approver can add notes for feedback as shown in the screenshot below.  

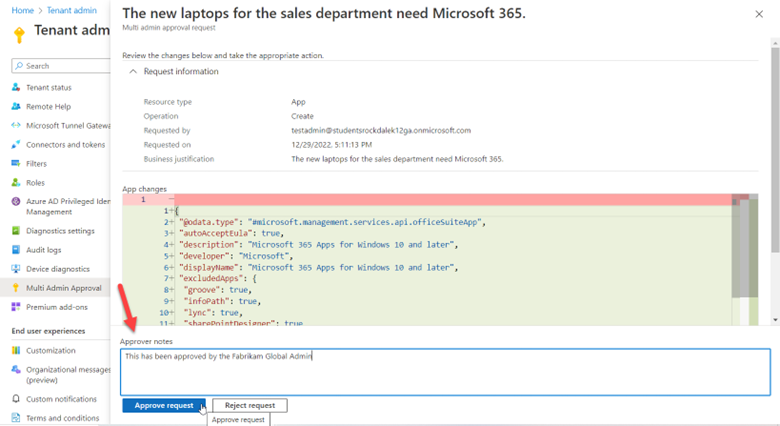
Switching back to the testadmin account, I can see the status of the requests made by that account. As shown below, one is approved while one still waits approval.

Note that any individual who submits a request and is also a member of the approval group can see their own requests, however, they cannot approve their own requests. Should no action be taken on a request for 30 days, it becomes expired and must be resubmitted.


Dec 2022
18

New Feature: Send Organizational Messages to Your Users with Intune

Intune has a new feature called Organizational Messages. It’s a way to send branded messages directly to Windows 11 devices using Intune. These messages notify and update users about key important information updates or provide onboarding information for employees.  This can be especially handy for organizations that utilize hybrid work strategies. There are three types of messaging to choose from.

  • Taskbar messages appear just above the taskbar and remain viewable until the user acts on them. Taskbar messages can be used to alert users about things like a critical Windows update that will be installed at the end of the week that will disrupt desktop operations.
  • Notification messages appear in the Notification Center as a popup before disappearing. Notification messages are good for informational messages such as a future training session.
  •  Get Started app messages appear in the Get Started app the first time a user initiates it once the device has been enrolled in Intune. These messages are good for sending welcome messages, device tips, company policy changes and new employee information.

To access the Organizational Messages feature, go to Tenant Administration in Microsoft Endpoint Manager and select Organizational Messages (preview) as shown below in the screenshot.

To configure Organizational Messages, you must be assigned one of the following roles.

  • Azure AD Global Administrator
  • Intune Administrator
  • Organizational messages manager (Microsoft Intune role)
  • Organizational messages writer (Azure AD role)

Prerequisites

Organization messages are only supported on devices running Windows 11, versions 22H2 or later. You must also have one of the following licenses for your users.

  • Microsoft 365 E3
  • Microsoft 365 E5
  • Endpoint Management + Security E3 and Windows Enterprise E3
  • Endpoint Management + Security E5 and Windows Enterprise E5

Each message type requires a logo for branding and identification purposes. This is usually the company logo. Only PNG files are supported, and each message type has a different dimensions requirement.

  • Taskbar messages must be 64 x 64 pixels
  • Notification area messages must be 48 x 48 pixels
  • Get Started app messages must be 50 pixels long and 50 – 100 pixels wide.

PNG files that don’t meet the exact dimension specifications will cause an error, preventing you from proceeding further in the message creation process as shown below.

You can include custom URLs in your messages, but they must be added to your list of verified Azure AD custom domain names.

Enabling Organizational Messages

Before creating your messages, you must enable the policy that allows the delivery of organizational messages. To do this, go to Devices > Configuration profiles and click “Create profile.” Select “Windows 10 and later” as the platform and “Settings catalog” as the profile type. Using the Settings picker, do a search for “experience” and then select it from the list of viewable categories. Then select “Enable delivery of organizational messages (User)” as shown in the screenshot below and complete the wizard by adding scope tags and user/group assignments.

Now you are ready to create your messaging.

Creating Organizational Messages

Go to Tenant Administration > Organizational messages (preview) and click on Message. You can then select the type of message you want to create as shown in the screenshot below. In this example we are creating a taskbar message.

Next you will upload your logo, which is required. You will also select which domain you want to apply the messages to and choose your preferred language. You can then preview what the message will look like.

Next you will configure a schedule for the message as shown below.

Complete the creation wizard by assigning the message to your targeted groups or users. Then review your created message.

The created message will then appear as part of your list of messages.

As mentioned previously, each of the three message types include different message templates. Below are some of the options for Notification messaging.

Some Limitations Concerning Organizational Messages

There are some limitations and issues concerning organizational messages that you should be aware of.

  • You cannot send messages to devices or mixed groups. An organizational message sent to both users and devices will only be sent to the users.
  • Users that belong to more than 200 groups are not supported by organizational messages (who knows why?)
  • You can’t assign priority levels to organizational messages so they will be received by users in random order.
  • Scope groups and scope tags aren't available in organizational messages.
Nov 2022
28

Managing Windows Package Manage with Group Policy

Microsoft made an announcement back in 2021 that Microsoft Store for Business and Microsoft Store for Education will be retired in the first quarter of 2023. Microsoft wants organizations to transition to Windows Package Manager (WPM) instead. WPM is a command-line tool that utilizes either PowerShell or the Widows Package Manager Client terminal, also referred to as Winget-cli. If you are running Windows 10 version 1809 or greater, it should be installed on your computer through a prior update. You can also install it with the App Installer from the Microsoft Store.

There are two primary components when it comes to WPM. The first is the package, which represents an ap, application or program. The other is the manifest file, which contains metadata used by the Windows Package Manager to install and upgrade software on the Windows operating system. WPM functions similarly to Linux package manager as it doesn’t actually host the packages. What is does is let you create manifests that form a script to download your desired apps from central repositories such as GitHub or the Microsoft Store.

The point of this brief article isn’t to get into the details of WPM but to show how you can manage it with Group Policy. To do this, you will first need the Desktop App Installer Policies” Group Policy Administrative Template files, which you can download from the Microsoft Download Center. You will need to copy these files over to your central store. The create a GPO and go to Computer Configuration > Administrative Templates > Windows Components > Desktop App Installer. You will then see a variety of available settings as shown in the screenshot below.


Let’s look at some of the most important settings here.

  1. Enable App Installer: Enable this policy so that users can use WPM. This and many of the WPM policy settings only require you to enable or disable them as shown in the screenshot below.


  2. Enable App Installer settings: Enabling this setting will allow users to change settings for WPM
  3. Enable App Installer Default Source. Note that the default source for Windows Package Manager is an open-source repository of packages located at https://github.com/microsoft/winget-pkgs. Disabling the policy will make the default source unavailable.
  4. Enable App Installer Microsoft Store Source: When enabled, the Microsoft Store becomes available as a source.
  5. Enable App Installer Additional Sources: When enabled, additional sources will be available. Note that once additional sources are added here, they cannot be removed. You must specify the source location as shown in the screenshot below.

     
  6. Enable Windows Package Manager Allowed Sources: This policy is somewhat like the previous one. When enabled, users will be able to choose a source from a list of approved user sources. Here, you must also specify the approved source locations

    You can refer to this site for the latest information regarding Windows Package Manager.


Nov 2022
16

How To Set Time Zones using Intune

If you’re using Intune as your endpoint management solution, there’s a good chance you are managing devices dispersed over a wide geographical area. That may include multiple time zones. So how do you go about ensuring that each machine is matched with its correct time zone?

There are a variety of ways to assign time zones to a Windows 10 computer.

  1. You can configure it within the registry by navigating to

\HKLM\System\CurrentControlSet\Control\TimeZoneInformation

Then create GPO using Group Policy Preference to deploy the registry settings.

  1. In Windows 10/11 you can use the Windows Time Zone Utility. This is a command-line tool that you run using an Administrator command prompt. The command is tzutil.exe. You can use the question mark to see the available commands.


    To see the list of time zones supported by Windows 10, you can use the /l switch. Keep this command in mind for future reference later in the article.
  2. You can also use PowerShell. The screenshot below shows a couple of available commands. The second command is used to assign the desired time zone. Note that I am using “Hawaiian Standard Time” that appeared using the tzutil /l command above.

  3. While you could deploy the PowerShell using Intune, there is a simpler way using the settings catalog.  Log onto the Intune portal and go to Devices > Configuration Profiles and create a profile. Choose Windows 10 as the platform and Settings catalog as the Profile type. Name the profile and then click the “Add Settings” link. Using the Settings picker, do a search for “time zone” and choose “Time Language Settings” as the category. Then select “Configure Time Zone” as shown in the screenshot below.


    Then input the desired time zone as shown below. These are the same time zone names we saw using the tzutil command utility earlier. In the example below I am assigning Eastern Standard Time. Other possible assignments could be Central America Standard Time, Central Brazilian Standard Time, GMT Standard Time, Pacific Standard Time, etc.


    Then like any configuration profile, select any optional scope tags, and assign the profile to the desired group or users.

     
Nov 2022
02

Should You Delete or Retire Computers from Intune?

We often talk about adding devices to the Intune environment, but what about deleting them. What’s the best way to do it? There are several options. One option is to have inactive devices automatically removed from Intune using a cleanup rule. An inactive device means it hasn’t checked into Intune for a set number of days. You can configure the time window by going to Devices > Device clean-up rules and configuring the two required settings. You can input a number between 30 and 270. In the example below I have chosen 120 days as the cutoff. This means that day any device that has been inactive for 121 days or more will be deleted from Intune immediately. By clicking on the “View affected devices” link you can see the list of devices that will be deleted once the rule is saved. Device clean-up rules do not affect Android devices.


To Delete or Retire?

You can choose to delete or retire a computer from Intune at any time. What’s the difference? The answer is not much. Let’s outline what happens when a computer is retired.

  • The device is removed from the company Intune portal
  • Intune Endpoint Protection is removed
  • Intune deployed certificates are removed
  • Device configuration settings are no longer enforced or required so users can override them
  • The computer will no longer received its updates from the Intune service
  • Apps can no longer be installed from the portal and any Intune client software is removed
  • WiFi and VPN profile settings are removed

When you retire a device, the retire process will begin the next time the device checks in and it will be removed from Intune once the steps outlined above in the list are completed. Delete means that the computer is removed from the Intune “All devices” list immediately. However, the retire process will begin the first time the device checks in. In other words, Delete performs the same tasks that Retire does. It just hastens the removal of the device from the listings page. The exception is cleanup rules that do delete devices immediately but do not retire them.

To retire or delete a device, go to Devices > All devices and select the computer you want to delete. Then choose the appropriate action you want as shown in the screenshot below.


Oct 2022
17

How to Import ADMX and ADML Templates into Intune

Both Group Policy and Intune offer multiple Administrative Templates out of the box that provide settings for Microsoft operating systems and applications. Some third-party vendors provide ADMX and ADML templates that you can use to deploy settings for their products as well, but you must obtain them from the vendor and import them.  

Importing Administrative Templates into Group Policy

Importing third-party administrative templates into Group Policy simply requires that you paste the templates into the SYSVOL. Let’s say I wanted to manage settings for Zoom. I downloaded the templates and then placed them in the SYSVOL of one of my domain controllers as shown in the screenshot below. Note that you must also place the corresponding ADML templates into the appropriate language folder as well.

Then I use Group Policy Manager to create a GPO and the Zoom ADMX templates settings will appear automatically.

The Intune Importing Process

The process for importing ADMX and ADML templates into Intune is of course completely different. First off there are few limitations at present to keep in mind.

  • You can upload a maximum of 10 ADMX files
  • You can only upload one ADML file for each ADMX file
  • Only en-us ADML files are supported currently
  • Each file must be 1 MB or smaller
  • Some ADMX files may have dependencies that must be uploaded first

After the matching ADMX and ADML templates are downloaded, go to Devices > Configuration profiles and select “Import ADMX.”

Click the Import link and navigate to the matching ADMX and ADML files as shown in the screenshot below.

Once completed, the imported ADMX template will now be listed. You must allot ample time for the templates to upload before using them as shown below.

In this case, the upload failed. In the screenshot below I clicked on the link to find out the details of the error.

It says that an ADMX file reference file called NamespaceMissing: Microsoft.Policies.Windows. was not found. This is one of the gotchas I mentioned above. To fix this, you must first click the ellipsis to the right and delete it. Then you need to upload the Windows ADMX and ADML files. These files are in your SYSVOL folder by default.  Upload them the same way you did the Zoom template files.

Once you complete the import wizard, click refresh until you see that the Windows.admx is available. Then upload the Zoom template once again. This time the upload process shouldn’t fail, and you will see both ADMX files available as shown below.

Now you can create Configuration profiles that use your imported ADMX files. Go to Profiles > Create profile and choose Windows 10 and later as the platform and Templates as the profile type. Then select “Imported Administrative templates (Preview)“as shown below.

Then you can select and configure the settings you want in your policy.

Then complete the profile configuration process by assigning the profile to your designated users.